
Tag Scheduling
Schedule when tags become visible and when they are hidden, for time-sensitive tag experiences
✨ Preface
Previously, making a tag appear or disappear at a specific time meant logging into the dashboard and toggling it by hand. AMP now offers two scheduling features that can be used together to create time-sensitive tags:
| Feature | What it controls | Effect |
|---|---|---|
| Hidden Tag Scheduling | Whether a tag is visible on the site | Tags become visible / are hidden at a specific time |
| Tag Pinning Scheduling | Whether a tag ranks first on the homepage, category pages, and product pages | Specific tags are moved to the front automatically at a set time |
Set the times in advance and the system executes them for you — ideal for campaign periods, seasonal themes, and limited-time promotions.
Key conceptA hidden tag rule only stops the tag from being displayed. The tag and its product associations remain in the system.
Hiding a tag does not:
- Remove its associated products from the tag page
- Remove it from site-search results
🕐 Before You Start
A few rules that apply to every schedule:
- Data sync takes time. After a schedule fires, it can take up to 1 hour for the change to reach the storefront.
- To make a tag visible: set the display time 1 hour earlier than you actually need it.
- To hide a tag: the tag will be hidden within 1 hour of the time you set.
- Only future times can be selected. The date picker automatically disables past dates.
- Schedules can be edited any time before they fire. Open the rule again to adjust or clear the time.
⚙️ Hidden Tag Scheduling (showing and hiding tags on a schedule)
Where to find it
Tag Management → Hidden Tags → Add Rule (or click the edit icon on an existing rule)
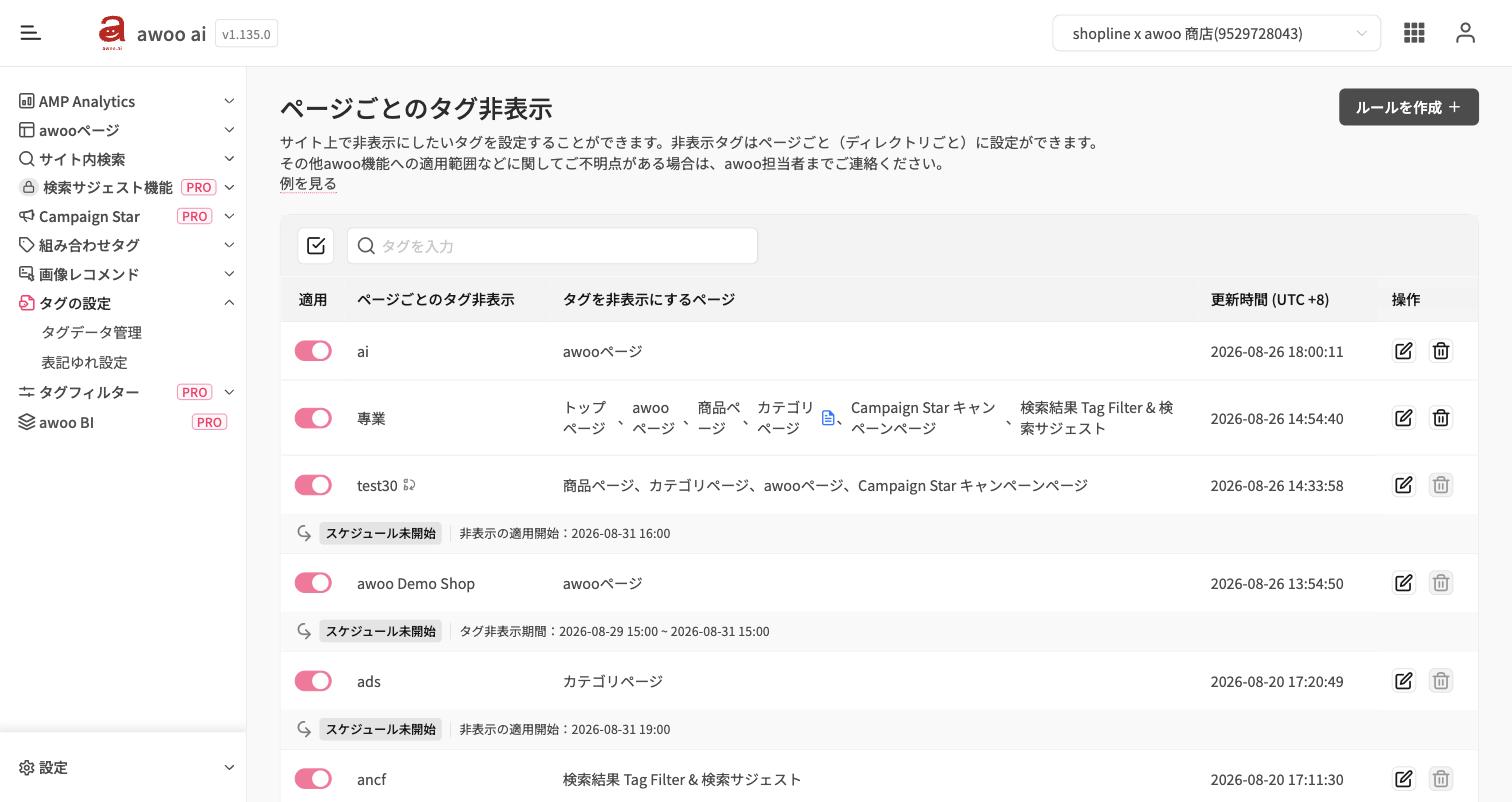
Every rule that has a schedule shows an extra row underneath it with the current schedule status (for example "Schedule not started") and the schedule details.
The status toggle shows the tag's current visibility, not the schedule status
- On: The tag is hidden now.
- Off: The tag is displaying normally now.
The toggle does not show whether the rule is enabled or whether its schedule has started. Check the schedule row below the rule for its status.
Steps
- Click Add Rule in the top right.
- Enter the tag you want to control in the Hidden Tag field.
- Under Pages Where the Tag Is Hidden, select at least one placement (Homepage, awoo Page tag page, Product Page, Category Page, Campaign Star campaign page, Site Search / TermSuggestion).
- Scroll down to the Schedule section and tick the options you need.
- Click Add (or Save when editing an existing rule).
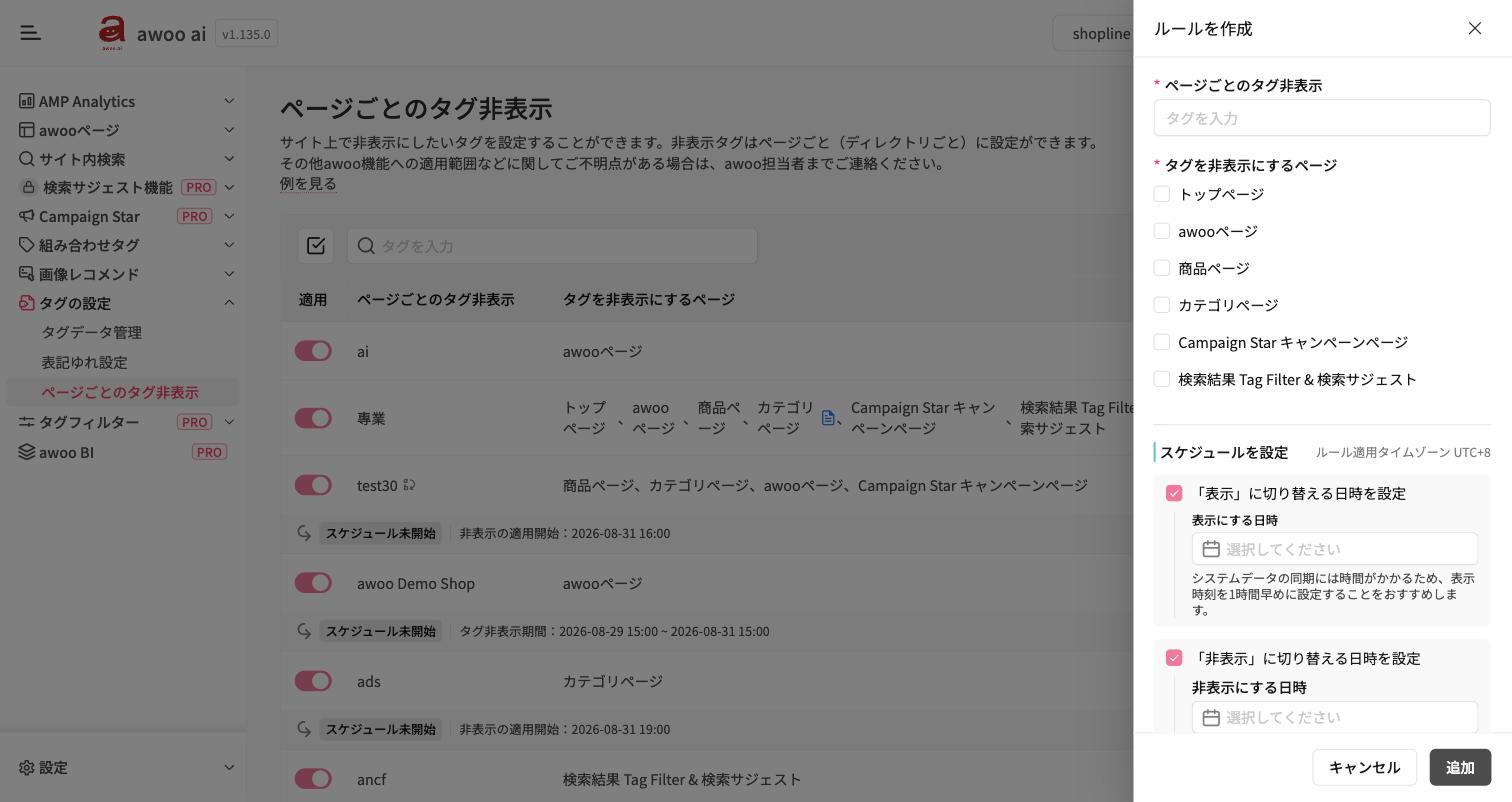
The two scheduling options
| Option | Field | What it does |
|---|---|---|
| Show tag automatically at a set time | Display time | At this time the tag becomes visible again |
| Hide tag automatically at a set time | Hide time | At this time the tag is hidden |
Click the time field to open the date and time picker, choose a value, and confirm.
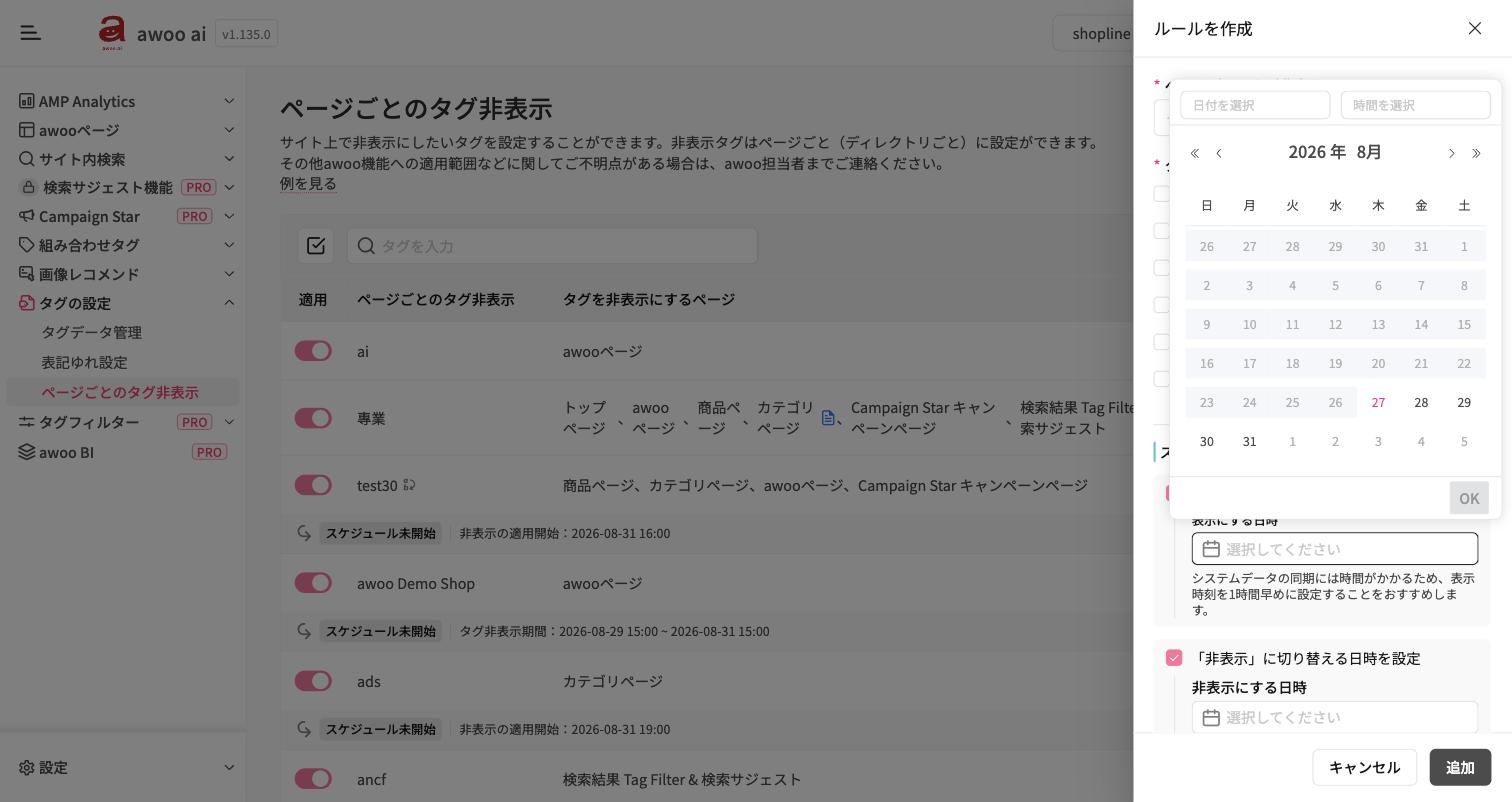
Three common combinations
| What you tick | Shown in the list as | Use case |
|---|---|---|
| Hide only | Tag hidden at: YYYY-MM-DD HH:MM | The tag should stay visible for now and be hidden at a certain point (e.g. a campaign ends) |
| Show only | Tag displayed from: YYYY-MM-DD HH:MM | The tag is currently hidden and should become visible at a certain point (e.g. a campaign starts) |
| Both | Tag hidden during: YYYY-MM-DD HH:MM ~ YYYY-MM-DD HH:MM | Define a window in which the tag disappears; it returns automatically afterwards |
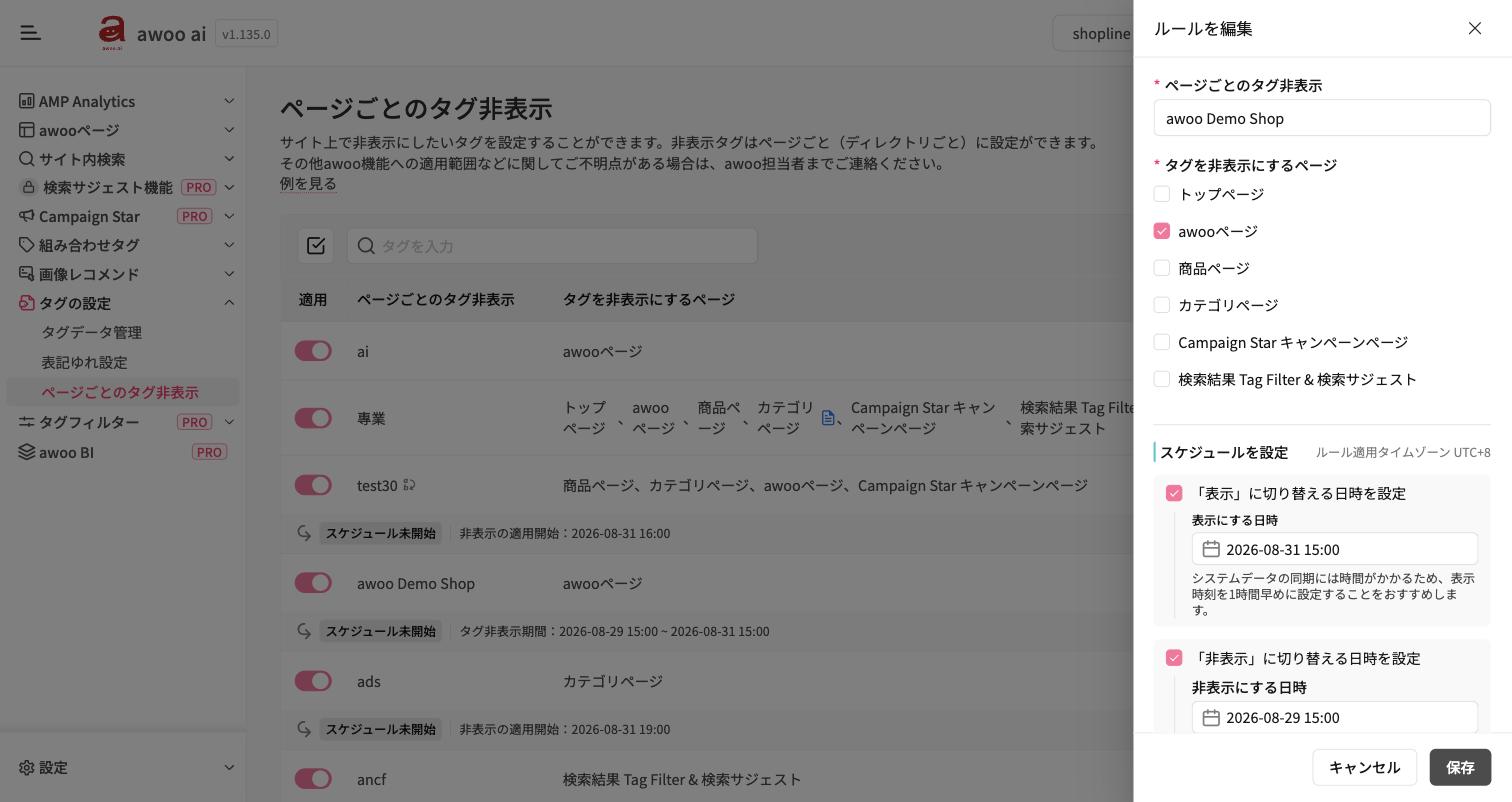
In the example above, the hide time is
2026-08-29 15:00and the display time is2026-08-31 15:00— the tag is hidden at 15:00 on Aug 29 and becomes visible again automatically at 15:00 on Aug 31.
The starting state is decided for you
A rule with no schedule has a Save and apply toggle at the bottom of the panel: you decide whether the tag is hidden the moment you save.
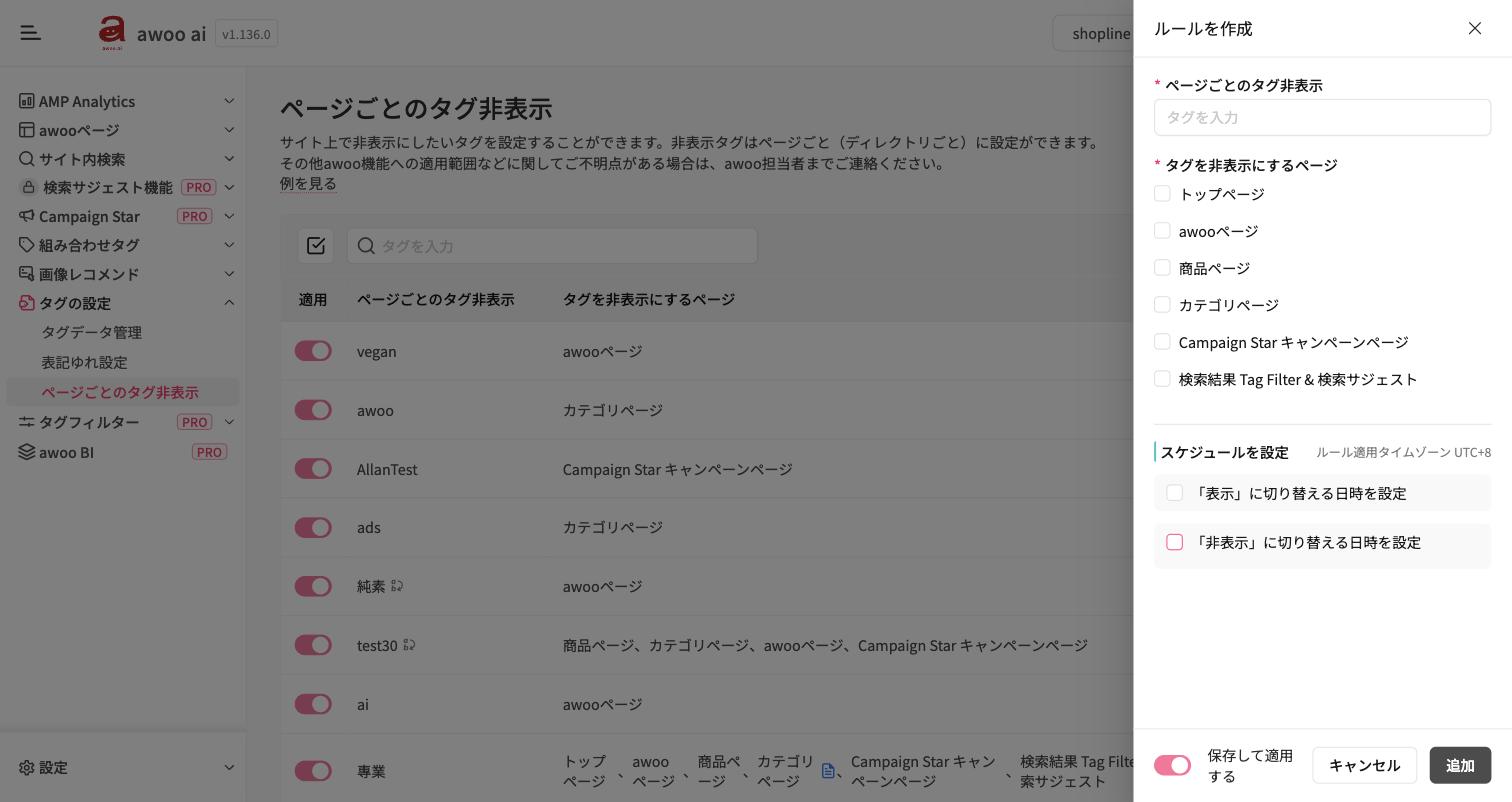
As soon as you tick either scheduling option, that toggle disappears. AMP works out the starting state from the schedule itself, so a rule can never contradict its own timing.
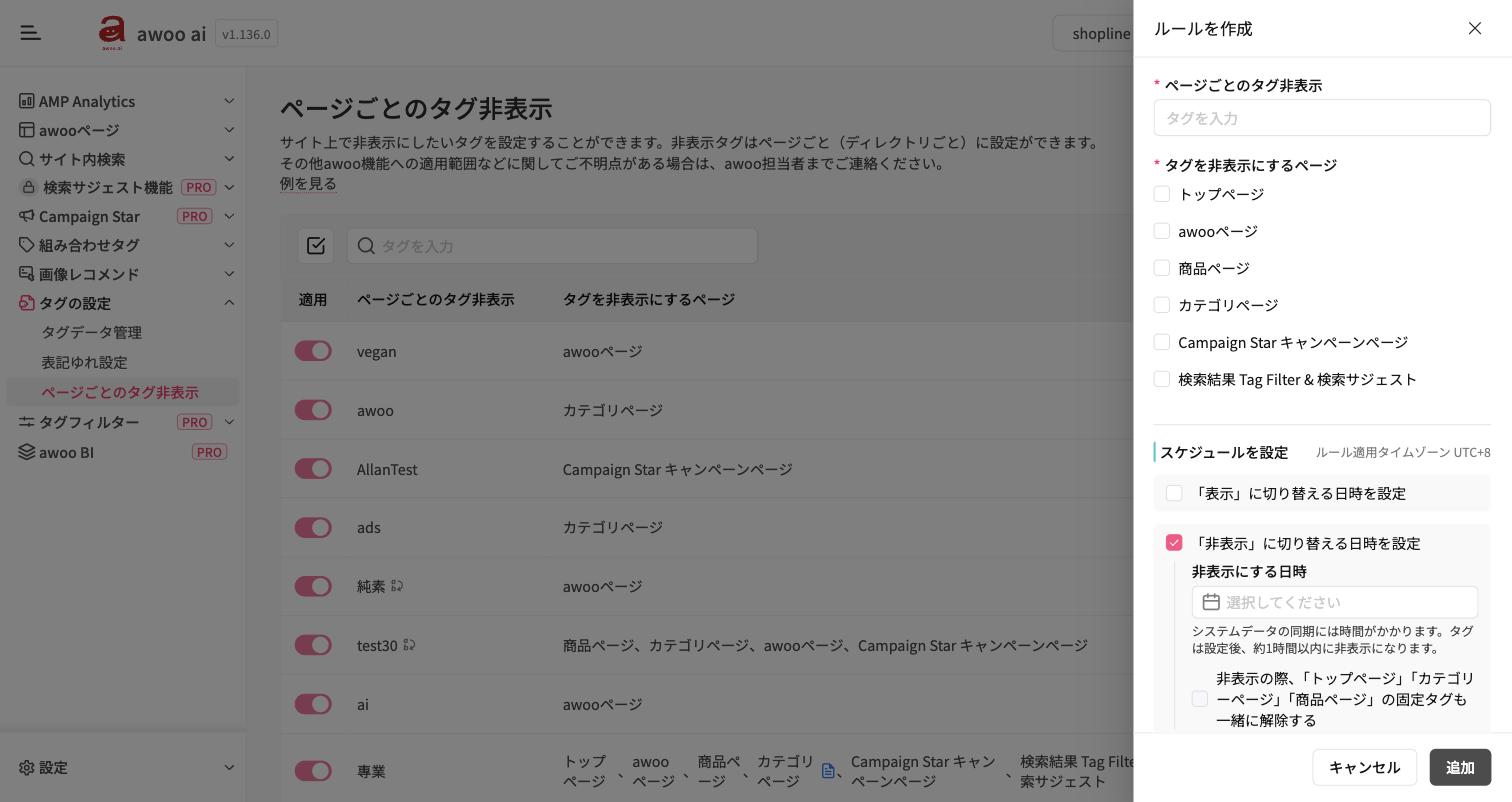
| What you set | Starting state | Meaning |
|---|---|---|
| Show only | Hidden | Hidden from now, becomes visible when the schedule fires |
| Hide only | Not hidden | Visible from now, hidden when the schedule fires |
| Both, Show comes first | Hidden | Hidden from now, the display schedule arrives first |
| Both, Hide comes first | Not hidden | Visible from now, the hide schedule arrives first |
Why this mattersSetting a hide time for the end of a campaign used to leave the tag hidden immediately, because the toggle defaulted to on. Now the same rule keeps the tag visible until the hide time arrives — the behaviour you would expect.
Advanced option: unpin automatically when the tag is hidden
Once Hide tag automatically at a set time is ticked, an extra option appears below it:
When the hidden tag takes effect, also remove the related tag pinning settings from the Homepage, Category Pages, and Product Pages
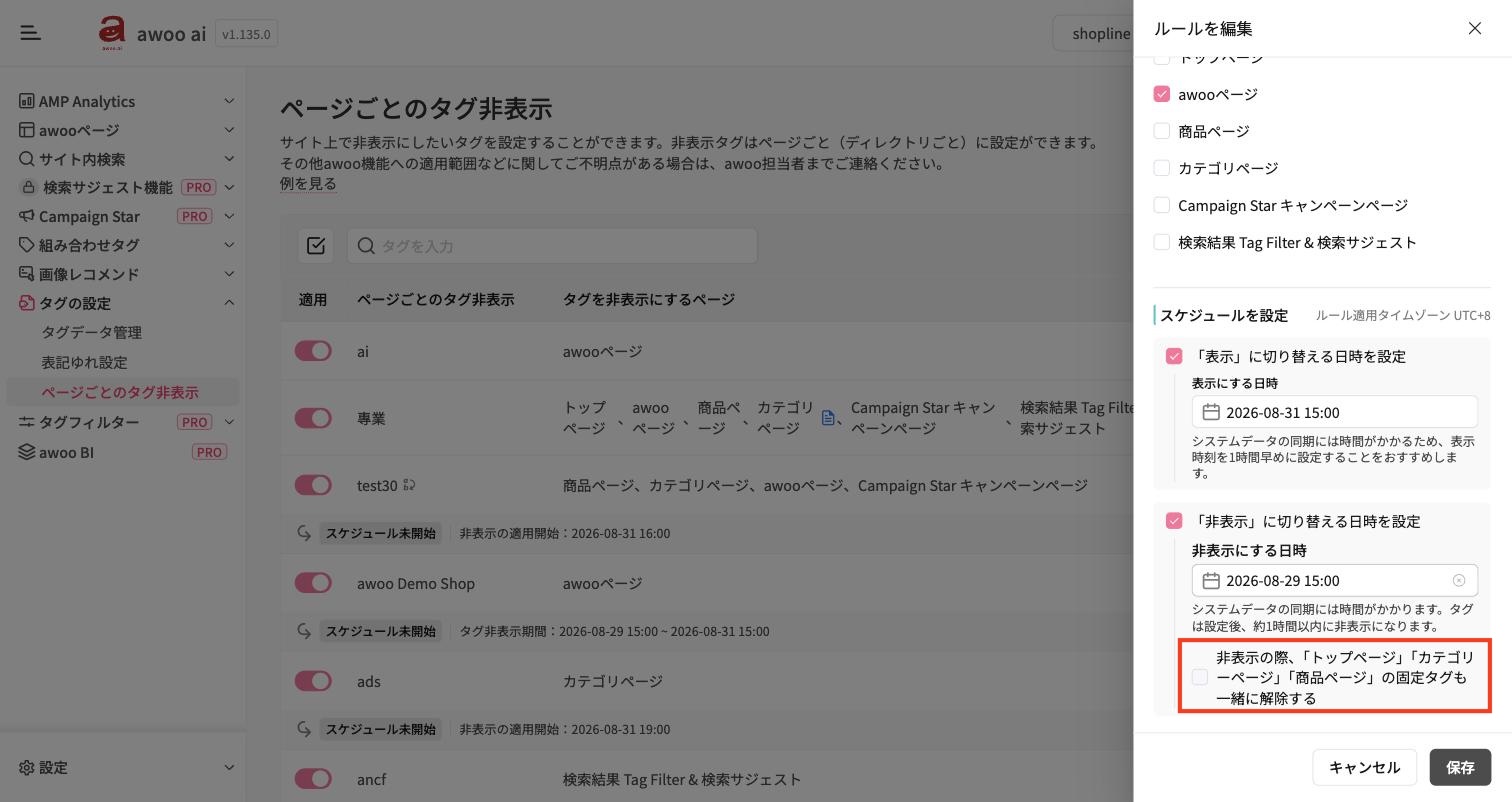
We recommend ticking this on any rule that ends a campaign. If a campaign tag was pinned to the homepage or a category page, simply hiding the tag would leave a gap in that pinned slot. With this option on, the system removes the related pins at the same moment it hides the tag, so the placement falls back to the system's automatic ranking — no second clean-up pass in the dashboard.
📌 Tag Pinning Scheduling (controlling where a tag is shown)
Hidden tag scheduling decides whether a tag is visible; tag pinning scheduling decides how prominently it ranks. Used together, you get "the moment the campaign starts, the hero tag appears at the front of the homepage."
Homepage
Where to find it: Tag Combination Management → Pinned Tag Combinations → Homepage
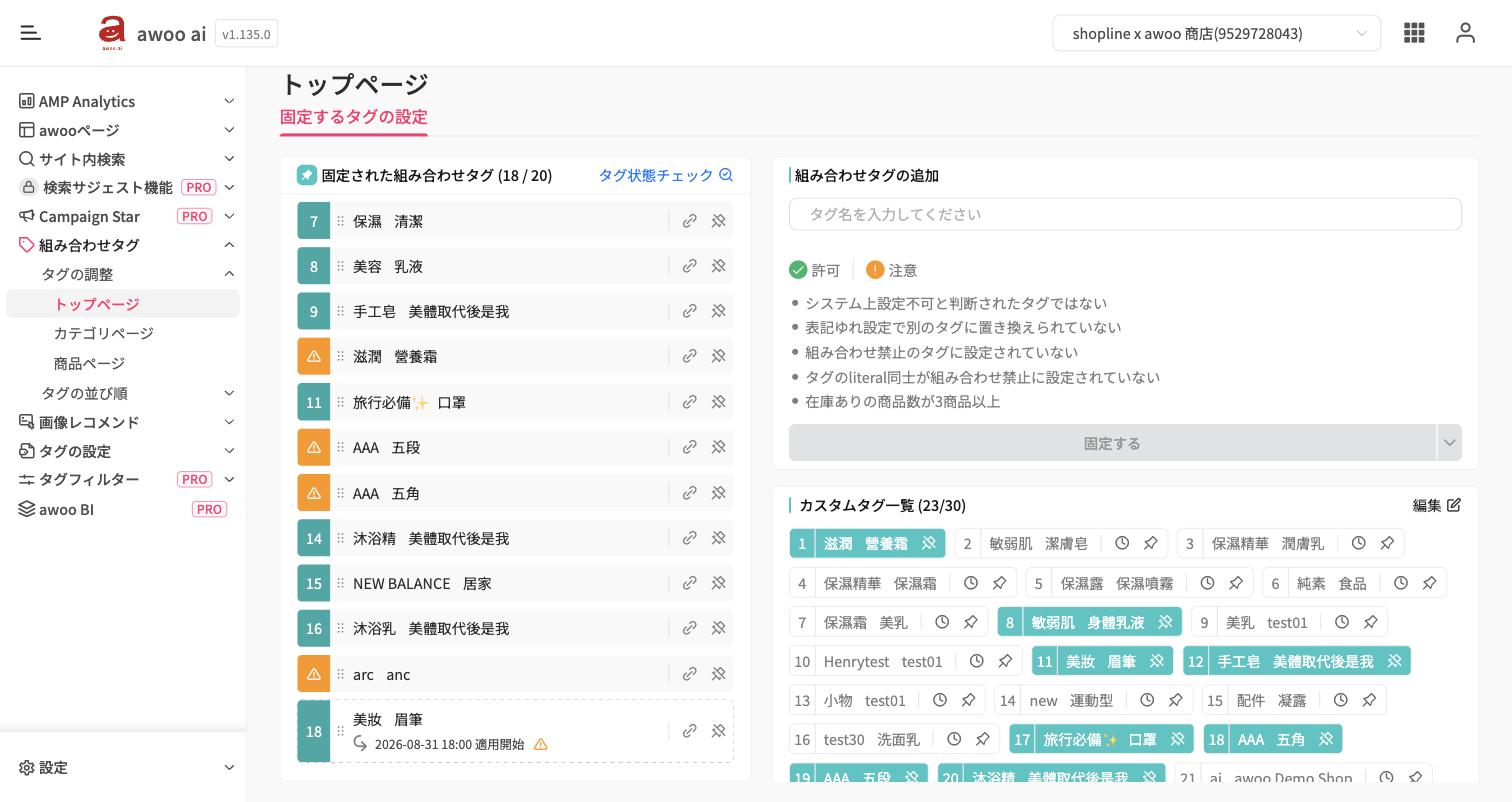
In the Custom Tag Combination List on the right, each tag combination that is not yet pinned shows two icons:
- 🕐 Schedule and pin — choose a future time; the combination is pinned automatically when that time arrives
- 📌 Pin — pin it immediately
Click the clock icon, fill in the Pin effective time, and save.
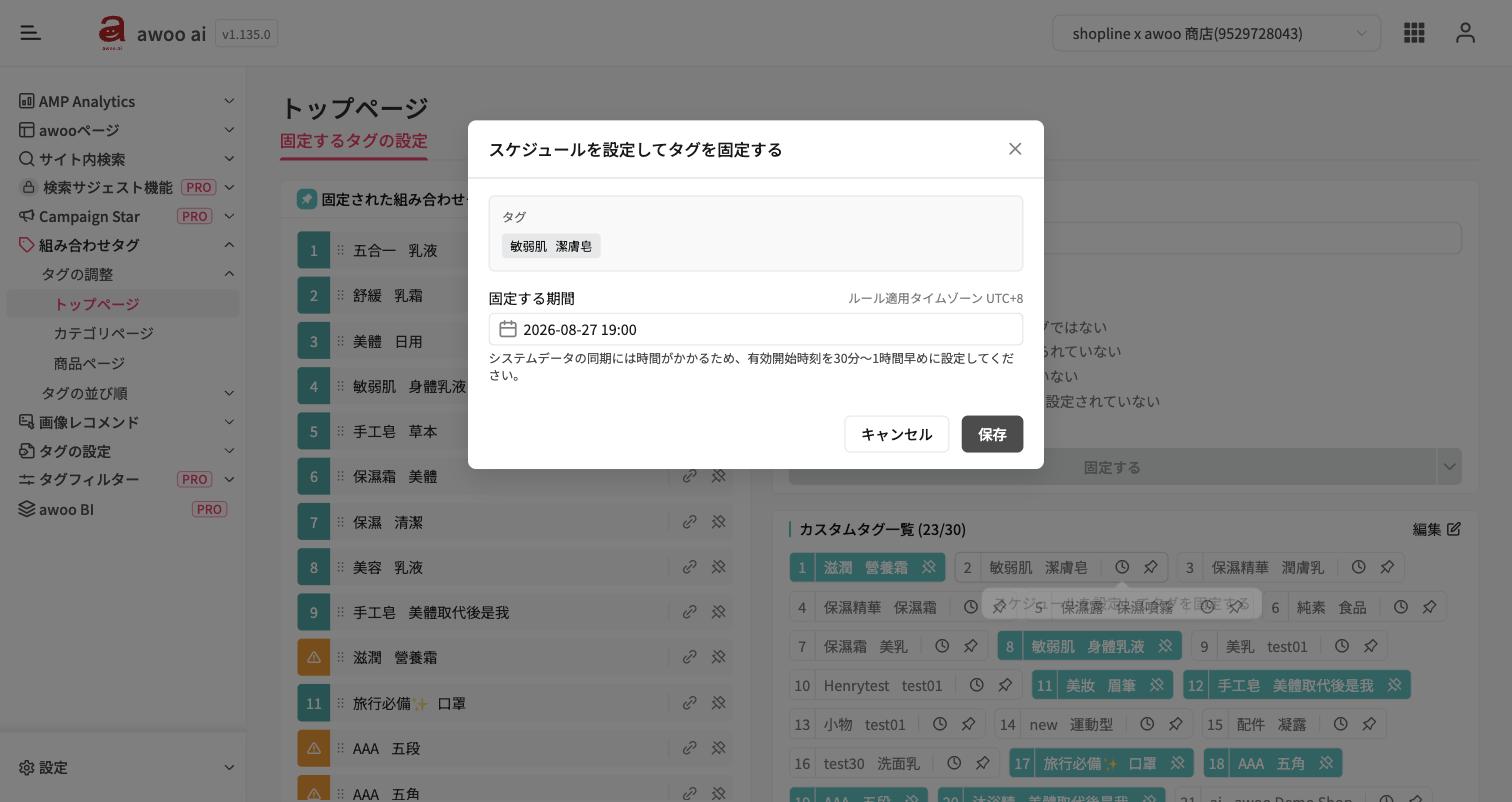
The combination then appears in the Pinned Tag Combinations list on the left, labelled with its effective time — for example 2026-08-31 18:00. Until that time it is only a reservation and has no effect on the storefront.
Category Pages / Product Pages
Where to find it: Tag Combination Management → Pinned Tag Combinations → Category Page / Product Page
Category and product pages are managed as rules: one rule can apply to many category pages (or many product pages) at once and specify which tag combinations should be pinned there.
Pins added inside a rule can now be scheduled as well, so a category or product page can bring a campaign tag to the front on its own:
-
Open the rule — Add Rule, or the edit icon on an existing rule.
-
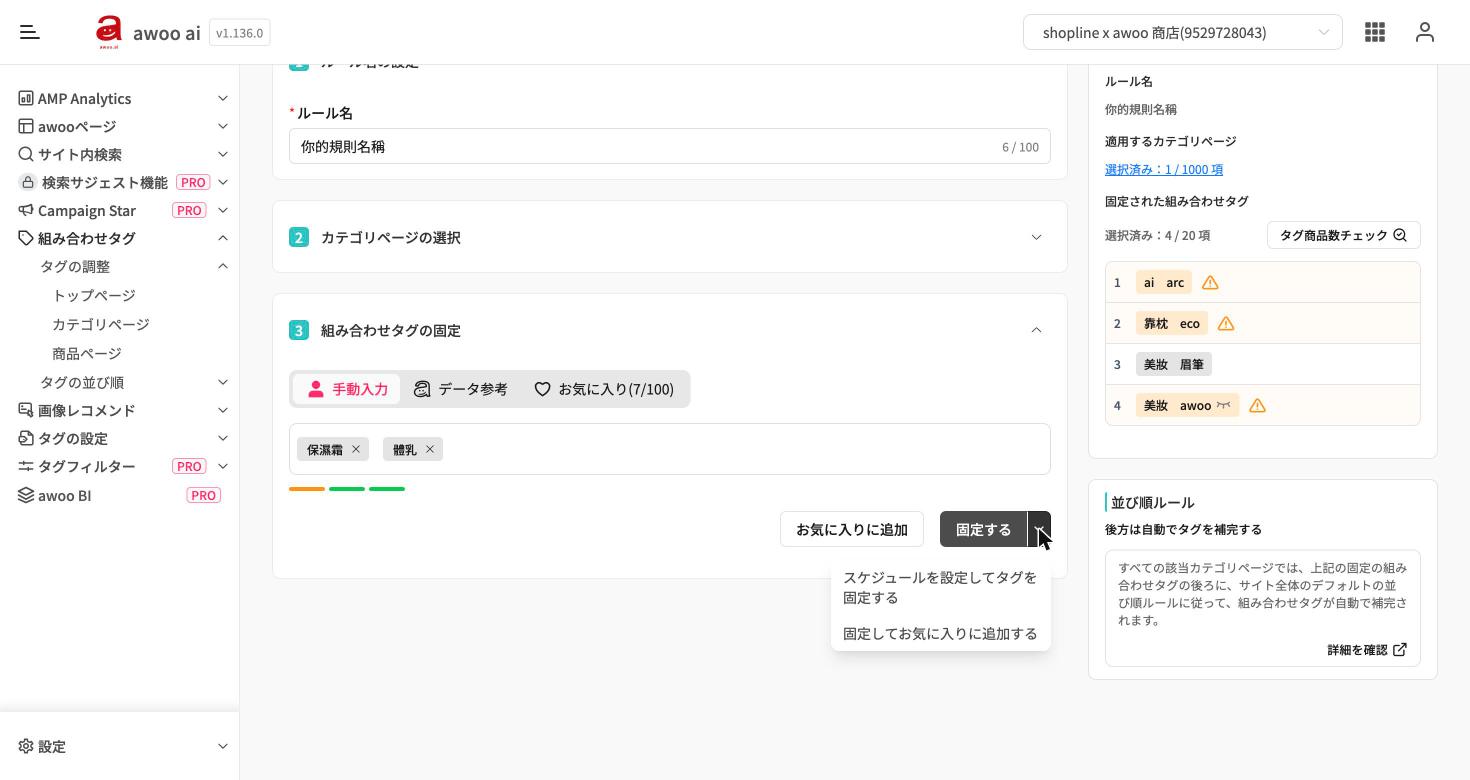
Go to step 3 Pin tag combinations and choose the combination you want, on the Manual input, Data reference, or Favourites tab.
-
Click the ▾ arrow next to the Pin button and choose Schedule and pin. (The same menu also offers Pin and add to favourites.)
-
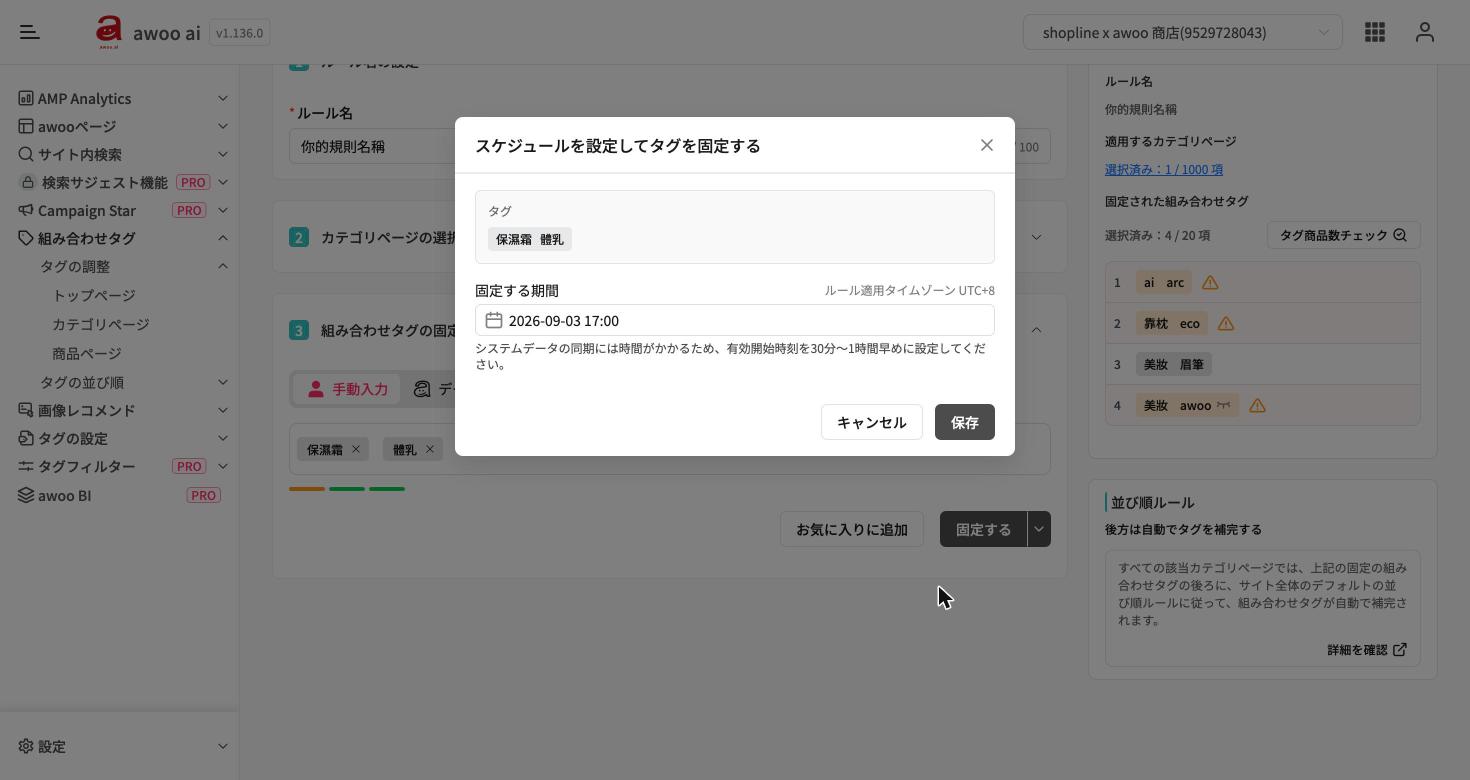
Fill in the Pin effective time and save the dialog.
-
Save the rule itself. Nothing is scheduled until the rule is saved.
Clicking Pin rather than opening the menu still pins the combination immediately, as before.
To have pins removed automatically at a given time, use the approach described in the previous section — set a hide time on the hidden tag rule and tick also remove the related tag pinning settings. The system handles the Homepage, Category Pages, and Product Pages together.
🎯 Example: a 618 campaign tag
Say the 618 campaign runs from June 10, 00:00 to June 20, 23:59, and you want the "618" tag to appear and be pinned to the homepage for the duration, then disappear on its own.
| Step | Where | What to set |
|---|---|---|
| 1 | Tag Management → Hidden Tags | Create a hidden rule for "618" and select the placements |
| 2 | Same rule → Schedule | Tick Show tag automatically, set Jun 9, 23:00 (1 hour early, to allow for sync) |
| 3 | Same rule → Schedule | Tick Hide tag automatically, set Jun 20, 23:59 |
| 4 | Same rule | Tick also remove the related tag pinning settings |
| 5 | Tag Combination Management → Pinned Tag Combinations → Homepage | On the combination containing "618", click 🕐 Schedule and pin and set Jun 9, 23:00 |
Because the display schedule arrives before the hide schedule, AMP starts the rule in the hidden state on its own — you do not set the starting state yourself.
Result:
- Jun 9, 23:00 → the tag becomes visible and is pinned to the front of the homepage
- Jun 10–20 → the tag stays visible with priority placement throughout the campaign
- Jun 20, 23:59 → the tag is hidden and the pins on the Homepage, Category Pages, and Product Pages are removed at the same time
No one needs to log in at midnight.
⚠️ Notes
- Allow a 1-hour sync buffer when choosing your times.
- Tags are never deleted. Hiding only stops the tag from displaying; the tag data and recommendation logic remain. To actually delete a tag, please contact your customer success manager.
- Pinning has limits. The homepage holds up to 20 tag combinations; category and product pages allow up to 50 rules each. Scheduled pins occupy a slot too, so check you have room before scheduling.
- Schedules stay editable until they fire. Open the rule to change or clear the time.
- Pinning schedules and hidden tag schedules are independent. If you schedule a pin but the tag is still hidden, the tag will not appear on the storefront. For a campaign, be sure to set both.
Updated about 2 months ago