
awoo Pixel Installation
Use this guide to embed snippets for user tracing on your website.
✨ Preface
awoo Pixel is a client-side script that traces the user interactions on your website. It monitors key user activities such as purchase, checkout, view page, and other significant behaviors. These user insights are pivotal for performance evaluation and data analysis on awoo AMP dashboard. Use this guide to examine all of the installation details of awoo Pixel, especially when it comes to (1) what kind of "event" should be triggered on (2) which "page" of your site, and (3) "parameters" to pass in.
Before getting started, a friendly reminder that if you've already installed SDK on your site, you're roughly ready to reap the benefit of awoo Pixel. Since most of the tracing scripts are SDK built-in (see table in the next section: awoo Pixel Event Specification,) what you have to do is just (1) implement the events that aren't SDK built-in, and (2) contact your awoo agent to switch on awoo Pixel functionality. On the other hand, for those who haven't installed any of the SDK, check the sections below for awoo Pixel's initialization, and detailed specifications for every tracing event.
It's All Your Choice!It's completely your choice to decide whether to trace user behavior through awoo Pixel, and you're able to call it on/off at anytime. Contact your awoo agent if you have any concern.
0️⃣ awoo Pixel's Initialization
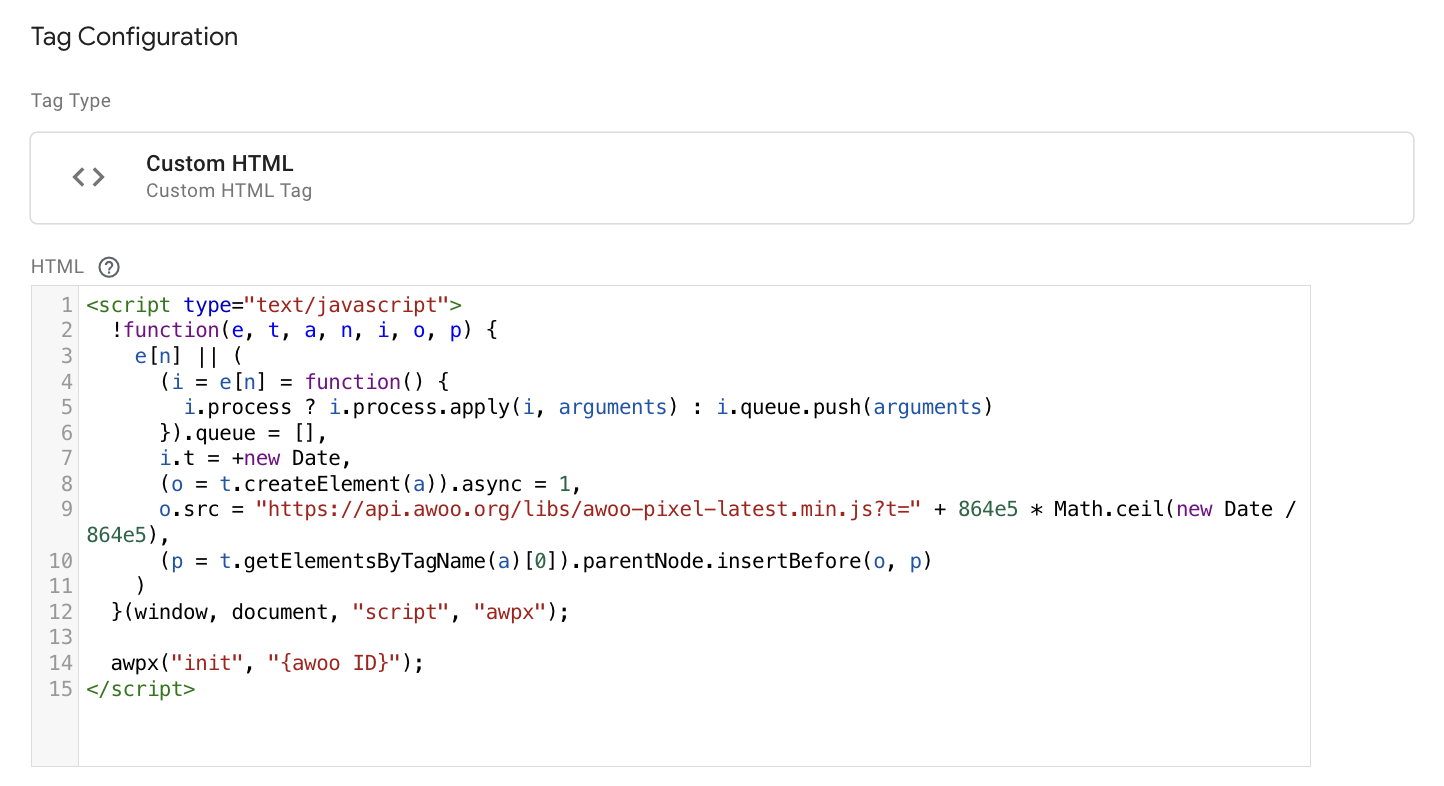
To utilize awoo Pixel, you should add the provided JavaScript code — adjust the last line to include your {awoo ID} as a string — to all pages of your website without additional modification. For optimum performance, we suggest inserting the initialization snippet between the <head> and </head> HTML tags of your website.
<script type="text/javascript">
    !function(e, t, a, n, i, o, p) {
        e[n] || (
            (i = e[n] = function() {
                i.process ? i.process.apply(i, arguments) : i.queue.push(arguments)
            }).queue = [],
            i.t = +new Date,
            (o = t.createElement(a)).async = 1,
            o.src = "https://api.awoo.org/libs/awoo-pixel-latest.min.js?t=" + 864e5 * Math.ceil(new Date / 864e5),
            (p = t.getElementsByTagName(a)[0]).parentNode.insertBefore(o, p)
        )
    }(window, document, "script", "awpx");

    awpx("init", "{awoo ID}"); // adjust here to include your awoo ID
</script>
The existence of the awoo Pixel's initialization is to make sure that the correspondent JavaScript library is loaded before any awoo Pixel Event is sent. If you're using Google Tag Manager (GTM) for the initialization, we highly suggest you set the trigger conditions to Initialization - All Pages, to have it loaded as early as possible. Be aware that any awoo Pixel Event sent before the initialization will cause an error in the console, and lead to wrong performance evaluation on awoo AMP dashboard.

There should be only one awoo Pixel's initializationMultiple awoo Pixel's initialization on a single webpage will cause error, so make sure you only have it loaded once per page.
🔮 awoo Pixel Event Specification
After successfully initializing awoo Pixel on every page of your website, you are now able to send awoo Pixel Event based on the user interactions with your website. For example, you can have a viewProduct event sent when a user is viewing the product page of your website, or you can have a purchase event sent if an order has been completed. User interactions traced by awoo Pixel will be summarized in awoo AMP dashboard for performance evaluation and data analysis.
All of the traceable user interactions and their corresponding awoo Pixel Event are listed below. For the rest of this guide (and its subpages,) we'll dive into the thorough installation steps for each event. Click the hyperlink on the event name to navigate. Idemo!
| awoo Pixel Event | SDK Built-in | User Interaction / Triggering Timing |
|---|---|---|
| viewPage | ✅ | all webpages loaded |
| viewMainPage | ❌ | main page loaded |
| viewCategory | ✅ | category page loaded |
| viewProduct | ❌ | product page loaded |
| viewProductRecommendation | ✅ | awoo Product Recommendations shown on page |
| viewTag | ✅ | awoo Tags shown on the page |
| viewTagPage | ✅ | awoo Page loaded |
| search | ✅ | awoo Search executed |
| searchInput | ✅ | user's search input into the awoo Search Bar |
| clickTermSuggestion | ✅ | awoo Term Suggestion clicked |
| viewSearchResultPage | ✅ | awoo Search-Result Page loaded |
| searchNoResult | ✅ | awoo Search-No-Result Page loaded |
| clickProduct | ✅ | awoo Product Recommendations clicked |
| clickTag | ✅ | awoo Tags clicked |
| addToCart | ❌ | product being added to the cart |
| checkout | ❌ | beginning of the checkout process |
| purchase | ❌ | purchase order completed |
Data collected by awoo PixelWe want to make it clear that awoo Pixel will not collect unnecessary/sensitive data from the user, especially those that will expose the user's identification, such as email or phone number. Here's a comprehensive table of the data collected by awoo Pixel. Don't forget that it's always your choice to call awoo Pixel off at any time. Contact your awoo agent if you have any concerns!
User-related Product-related Order-related device type product id revenue screen size product name order id browser session discount price quantity browser version sales price currency code ip address user language
🦥 Required Events for awoo AMP Dashboard
The installation of awoo Pixel Event is the key to unlocking performance evaluation on the awoo AMP dashboard. However, installation for a total 17 events might seem like a huge effort for most of our clients. Therefore, we have compiled a list of required events to be installed based on your desired performance reports in the awoo AMP dashboard. (If you're interested in the "Overview" report in the awoo AMP dashboard, you still need to install all of the events.) Check the table below for details:
| awoo Pixel Event | awoo BI | Evaluation of awoo Tag |
Evaluation of Product Recommendation |
Evaluation of awoo Search |
Evaluation of Term Suggestion |
|---|---|---|---|---|---|
⭕ |
|||||
⭕ |
|||||
⭕ |
|||||
⭕ |
|||||
⭕ |
⭕ |
||||
⭕ |
|||||
⭕ |
|||||
⭕ |
⭕ |
||||
⭕ |
|||||
⭕ |
⭕ |
⭕ |
⭕ |
||
⭕ |
|||||
⭕ |
⭕ |
⭕ |
⭕ |
⭕ |
|
⭕ |
|||||
⭕ |
⭕ |
⭕ |
⭕ |
⭕ |
|
Edited by: Justin Sung
Updated about 1 year ago